1. Clipboard
2. Font
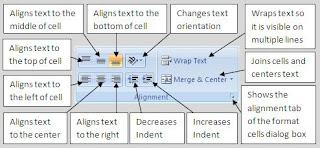
3. Alignment
4. Number
5. Styles
This group offers more complex formatting. The first command button allows users to apply conditional formatting. This can be used in many ways, for example, for a set of exam results, you can use that button to perhaps change colour of all results that are below the pass mark.
The second button, Format as Table, allows you to format the table as a whole (you'll need to highlight the whole table first). It offers different formatting for the headings of table compared to the rest of the rows. You can either apply any of the format already stored or customise it to your own preference.
The last button, Cell Styles, allows you to change a single or multiple cell styles. You can change background colour or add coloured underline or change font. We'll be using these command buttons in later posts.
6. Cells
The first command button, Insert, allows the user to insert cells, entire columns or entire rows and sheets.
The second command button, Delete, allows the user to delete cells, entire columns or entire rows and sheets.
The final command button, Format, allows the user to re-size, change visibility of cells, protects cells and can allow users to do most, if not all of the functions of the Font, Alignment and Number Tab. It is particularly useful if you want to change multiple aspects of one cell or many cells.
7. Editing
The first command button is the AutoSum. This allows the user to get the total of adjacent cells (either consecutive cells in a row or in a column). The little arrow allows users to select other functions other than the AutoSum, like Average which takes the average in a similar manner or Count etc.
The command button below is Fill. This allows the user to copy a pattern onto adjacent cells. For example if you have a column with heading date, and you want to enter all the dates of January, you can enter the date in the first three cells under the heading date and highlight those cells along with another 28 cells below (as January has 31 days) and click the fill button, this would automatically fill the rest of the dates.
The next command button down is Clear. This allows the user to clear the entire cell or selectively clear just the contents of a cell, just the formatting or just the comments.
Use the comments section below if further clarification is needed. Also we'll be referring to each of the buttons in later posts with images of examples to show the effects of these buttons.


No comments:
Post a Comment